User Activity based Expiration Policy for Office 365 groups is now generally available!

We would like to draw your attention to a few resources available to you: 

  • Documentation will be updated shortly: https://docs.microsoft.com/en-us/office365/admin/create-groups/office-365-groups-expiration-policy
  • https://docs.microsoft.com/en-us/azure/active-directory/users-groups-roles/groups-lifecycle

THANK YOU to all private preview participants for the feedback and comments you shared in this community. Please continue share your thoughts here. Also, please feel free to reach out to us on:

Office 365 Groups power collaboration across Office 365 

Collaboration is a key ingredient for the success of any organization. Office 365 groups, of the most used collaboration features in Microsoft 365 today, power the collaboration features across apps, including Outlook, Teams, Yammer, and SharePoint. Employees can create groups quickly and start collaborating with co-workers by sharing group documents, emails, and calendars.

The twin problems of Groups Life cycle Management 

As the number of Office 365 groups increases, an organization needs to strike a balance between cleaning up unused groups and ensuring any valuable groups do not get deleted unintentionally, causing data loss. Many of you have shared feedback about these challenges in groups lifecycle management.

You say, we listen and act

We heard your feedback, and we’ve made some changes! We are excited to announce the new version of expiration policy which ensures any group being actively used continues to be available, circumventing expiration. This feature makes life easier for users, including admins, group owners and members, by automating the expiration and renewal process by tracking groups for user activity across different apps, like Teams, SharePoint, Outlook, tied to the group.

The new expiration policy puts group life cycle management on autopilot 

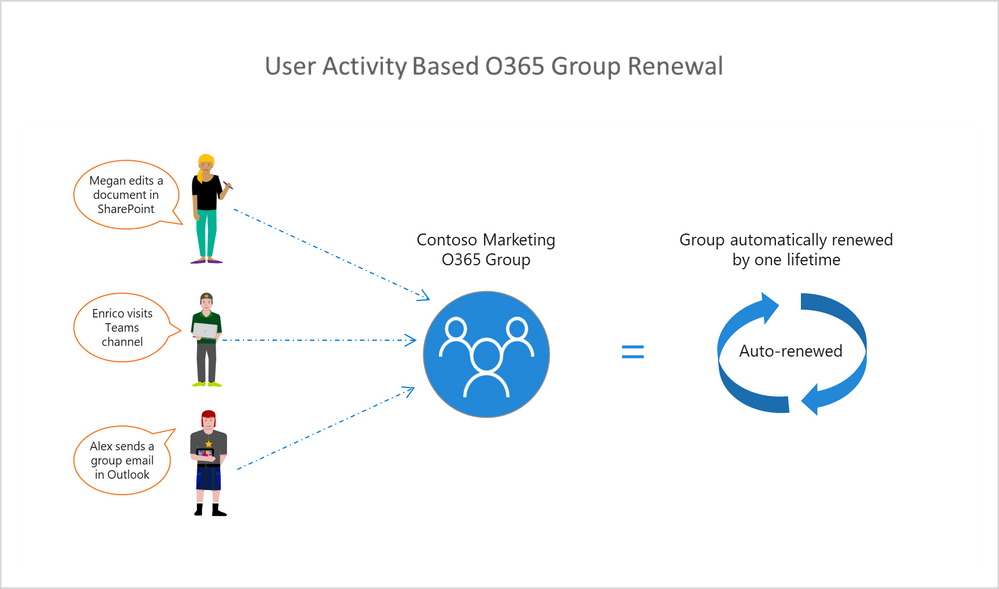
The current Expiration policy allows you to set an expiration time frame for selected or all Office 365 groups . After the defined group lifetime, owners are asked to renew them if they are still needed. With this newly added intelligence, groups which are being actively used will be automagically renewed. This preempts the need for any manual action on the part of the group owners. This is based on user activity in groups across Office 365 apps like Outlook, SharePoint, Teams, Yammer, and others.

Example:  At Contoso, the administrator has configured the Group lifetime to be 180 days. Megan is the owner of the Contoso Marketing Office 365 Group, with Enrico and Alex as its members. Her group is set to expire in 45 days. If an owner or a member performs actions like uploading a document in SharePoint, visiting Teams channel or sending an email to the group in Outlook, the group is automatically renewed for another 180 days, and she does not get any expiry notifications.

Image 1.png

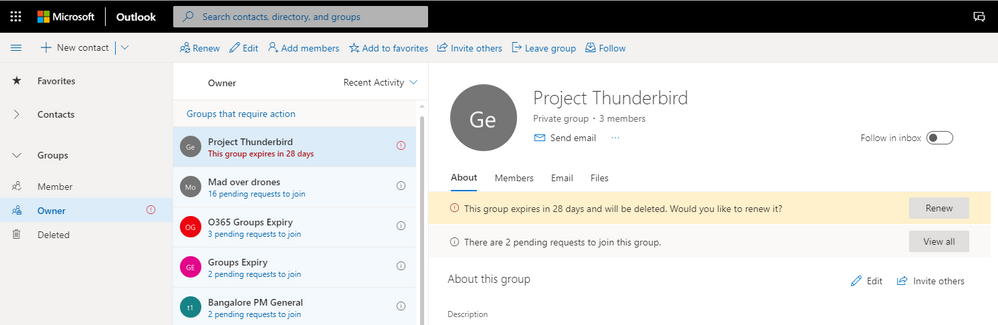
Manual Controls: Group owners will continue to have the manual “delete”, “renew” option for granular control.

Soft Delete: Like before, groups which aren’t renewed (either automatically based on activity or manually) will be soft deleted. Groups in “Soft-delete” state can still be restored within 30 days, after which the content is deleted permanently.

Image 2.png

User actions for group auto-renewal: The following user actions will lead to automatic renewal of groups

  • SharePoint – View, Edit, Download, Move, Share, Upload Files
  • Outlook – Join group, Read/write group message from group space, Like a message (OWA)
  • Teams – Visit a Teams channels

We will continue to update this list to fine tune group auto-renewal experience.

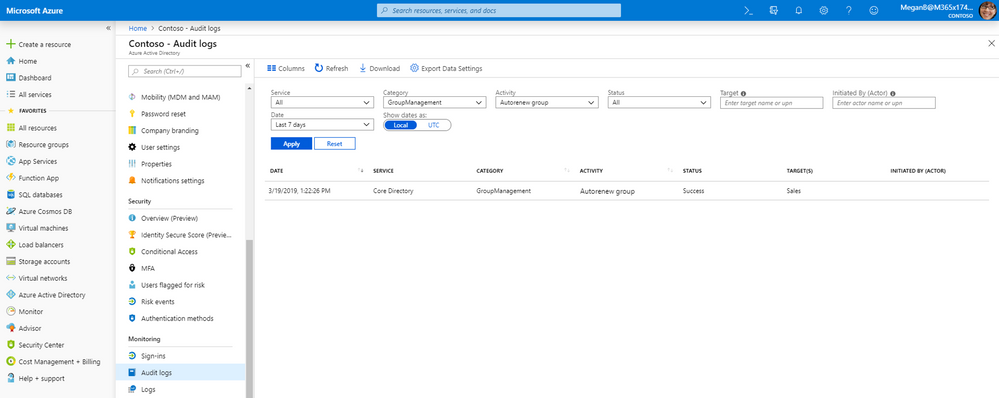
Auditing and reporting: Administrators can get a list of auto-renewed groups from audit logs on the azure portal.

Image 3_2.png

Here are some quick steps to get you started.

Getting started

Office 365 groups expiration policy can be configured from the Azure Active Directory portal, as well as programmatically via Azure Active Directory PowerShell. Please note you need an Azure AD Premium license. Below is a quick tutorial on how to get started with the functionality in the new Azure portal experience.

Image 4.png

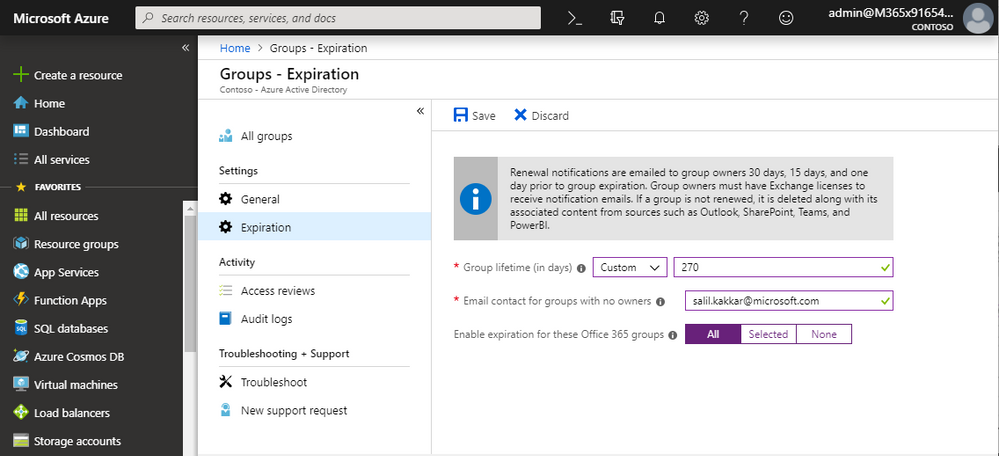
1. Create Expiration Policy: Sign into the Azure portal, select Azure Active Directory, go to the Groups tab and select Expiration under Settings. (More details here) .

2. Set Group Life cycle: Specify the group lifetime in days and select which groups you want the expiration settings to apply to.

Group owners will receive a renewal notification 30 days before the expiration date, and from that notification they can renew their group with a single click!

Set up Office apps for the first time:

Tap any Office app like Word, then tab Allow on both prompts to let the Office app access your files and contacts.

Tap Allow to grant access to Files
Tap Allow to grant access to Contacts

Sign in with your Microsoft Account or Office 365 work or school account.

greyline
Enter your Microsoft Account email or Office 365 account

If you sign in with a Microsoft account that’s associated with Office 2016 or Office 2019, you may get the option to upgrade to Office 365. Follow the instructions to purchase a plan, or select May be later if you want to use the apps without a subscription. Note that you get extra features if you use an Office 365 subscription.

greyline

If you’re prompted to create a Microsoft account, just add a password to create one and then follow the prompts to verify your identity.

If you have other Office apps installed on your Android device, your account and OneDrive files will be automatically added.

Enter your password.
greyline

To add another account, tap Open (or Open other documents if you’re on a tablet) > Add a place.

If you are using OneNote, tap Settings Accounts.

Select Add a place
greyline

Choose the cloud service you want to add, such as OneDrive for business or Dropbox.

Choose your cloud service.

[/et_pb_accordion_item][et_pb_accordion_item title=”Install and set up Office on an iPhone or iPad” _builder_version=”4.0.2″ hover_enabled=”0″]

Use the Office mobile apps to work from anywhere, just sign in with a free Microsoft account or an Office 365 work or school account. With a qualifying Office 365 subscription, you’ll have access to the app’s extra features.

Note: Are you on a MacBook or Mac? You’ll install the desktop version of Office.

What is Office Setup and How to Install Office.com/Setup

What is Office Setup?

Office Setup is use for installing application software Microsoft Office. This application provides you a chance to work on Word, Excel, viewpoint, onedrive, and PowerPoint from over the room, so you can easily feel during presentations. With Office Remote, you can begin your PowerPoint presentation, advance the slides, see your speaker notes, and control an on-screen laser pointer with a pinch of your finger.

New Microsoft Office 2019

Office 2019 is the latest version of Microsoft Office, a complete suite, succeeding Office 2016 at office.com/setup. It was released with configuration capabilities for Windows 10 and for macOS on September 24, 2018. Office 2019 incorporates a considerable lot of the highlights recently distributed in Office 365, alongside improved inking highlights, new activity includes in PowerPoint including the transform and zoom highlights, and new formula and graphs in Excel for data analysis.

Step by step guidelines to Install Microsoft Office on your PC or Mac

Before beginning Microsoft Office Setup/Installation on your PC or Mac, you will require a substantial product key/code.

  • Go to www.office.com/setup, Sign in or call us at +1-800-683-5717 for installation support
  • Enter your Office setup product key that you can get after purchasing and
  • Install your Office 365 or Office 2016 on your computer or Mac
  • As soon as you logged in, your product will be ready to install. Else you have to login first.
  • Downloading time will depend upon the speed of your internet connection.
  • Once the download is finished, it will begin installation Office on your Computer.
  • Follow all the guidelines showed on the application.
  • On the off chance that you don’t have a account, at that point make new Account.
  • Click on Activate Button.
  • Every one of the software will work. Suggested (Google Chrome).
  • Type www.office.com/setup in your location bar and hit Enter.
  • A page will open with two alternatives (Login/Signup). Office.com/Setup login.
  • In the event that you as of now have a Microsoft account, at that point essentially login into your account.
  • After you click on Next Button, activation list will come up on your screen.
  • Click on Installation button
  • When you have grasped key card, then turn on your PC.
  • The size of these documents are approx. 1-2GB.
  • You can make your account with your current email address also.
  • When the account downloads, there will be two choices (open and spare).
  • Click on Open.
  • In your account segment you will see a territory where you need to enter your product key.
  • Type in your 25-digits product key in five boxes, each field can hold 5 digits. Click on Next.
  • Click on each authorization it may request.

SFC Examine now for windows Live Assist – Office Setup

You should refresh all the outsider equipment drivers to introduce Window 7 refreshes. You can physically refresh the drivers however there are numerous drivers on the makers web-based interface. Or maybe, there are outsider propelled devices to refresh every one of the drivers.

Taking a shot at this issue fix without anyone else’s input is much problematic. Along these lines we prescribe you to arrive at our specialized specialists accessible on visit for a simpler arrangements. Since we esteem your time and have different alternatives to assist you with ordinary updates

These are similar strides to pursue for the other mistake codes during Windows 7 refreshes disappointment. Likely you can attempt to connect our administrations for getting help. We have high effective professionals who normally deal with numerous clients PC. We guarantee you the issue fix. Along these lines you need not to stress and turn into a specialist to determine fundamental issues. Must visit download office for more information.

The most effective method to utilize a SFC check now:

As a matter of fact, SFC output is a direction and it is utilized for windows framework files.This is chiefly utilized in order prompt.Open the order brief and type the direction and snap alright.

The procedure will be done after that check the framework files.System document checker will currently confirm the uprightness of each secured working framework record on your computer.It may take a long time to wrap up.

when check arrives at 100%, you will see something like this in the direction brief window.

When the procedure will be done after that restart your computer.Sometimes check the SFC examine in disconnected.

Run SFC examine now on outside drivers:

On the off chance that windows are not stacking up and you need to run the framework document checker on the drive what might you do?Well, you can utilize outer fix circle or evacuate the hard drive and interface it to another running windows PC to play out the SFC examine.

Framework document checker:

Framework document checker is an utility in Microsoft Windows that permits clients output to reestablish the defilements in windows framework files.Due to the issues with Windows applications having the option to overwrite records in windows. Microsoft Office.com/setup has since executed various safety efforts to shield framework documents from noxious assaults, debasement or issues, for example, DLL hellfire.

How To Fix The Office 365 Preview Activation Error 0x8004FC12?

Microsoft office is a great software package that helps in accomplishing essential tasks; several companies and corporate offices use it. However, users do face issues from time to time-related to errors that occur while operating the office programs. The activation office error 0x8004FC12 in office 365 is a common problem faced by the users. You can follow the guidelines mentioned below to fix this error.

Adding a net local group

  • Begin by pressing the window key + X hotkey and then choose the command prompt option from the menu to open it.
  • Now, enter the net local group administrators local service/ add in the command prompt then tap the return key.
  • Now input the fsutil resource set auto reset true C in the command prompt and then tap the enter key. Then enter in the prompt window the netsh int ip resetlog.txt
  • After this, you can close the command prompt and restart the system.

Updating windows 10

  • Firstly click on the task bar button or Cortana then enter or input updates in the box. Choose the check for updates option for opening the settings of windows updates.
  • Press the button of check for updates for update details; you will see a button that states install now if there are some updates to install. Press on the tab for updating windows.

Switch off the firewall

  • Input the windows firewall in the search box of Cortana, choose the windows firewall for opening the control panel.
  • Now click on the option that says turn windows firewall on or off. Choose the turn off option from there, after activating the office you can switch the firewall back on.

Repair the office

  • Right-click on the start tab to open the programs and features, a menu will appear from that you can choose programs and features for opening the control panel window.
  • Continue further by right-clicking on office and choosing change, you will see the diagnostic tool. Choose the option that states quick repair, and then press the repair tab to follow the wizard guidelines.

Get in touch with us

You can contact Office customer support for technical assistance if you are facing issues regarding the errors. Our team of experts will help you thoroughly in troubleshooting the problems you encounter while operating the software. They will guide you with easy step by step instructions to solve your queries efficiently.

Kaylee Smith is a self-professed security expert; she has been making the people aware of the security threats. Her passion is to write about Cyber security, malware, social engineering, Games,internet and new media. She writes for Ms-Office products at office.com/setup or office.com/myaccount.

Prescribed Documents for Word, PowerPoint, and Excel on Windows!

Get to Your Most Important Work Faster

Even with regularly extending document, email, and dialog traffic, we are attempting to enable you to discover the records that are most critical to you and your group.

How would you monitor or become mindful of a Word record that has had 3 diverse alters in the most recent day, or discover that you’ve been @mentioned with a few inquiries in an Excel document, or that you have 5 new remarks in a significant introduction your group is chipping away at? Consider the possibility that you had an organized rundown of documents that had the most huge sharing, remarking, @mentions, altering, and opening action.

To keep your pc viruses free install visit here : office setup

The Recommended Documents administration is the “enchantment” that enables monitor the majority of this for you – the Intelligence screens all the record action and uses AI (ML) to think of a short rundown of records that is exactly what you need, sparing you time and lessening diversion.

  • Utilizing Recommended Documents

This administration is currently accessible in Word, Excel, and PowerPoint for Windows, and can be gotten to when you snap File and either open or make a record. You’ll see a gathering of cards that give effectively searchable data about the substance and coordinated effort status of a couple of reports that we trust you should focus on. We should audit every component:

  1. The focal point of the card includes a thumbnail so you can rapidly perceive the document.
  2. The upper part includes a symbol to demonstrate what kind of movement is most noteworthy and discloses to you it’s identity related with. The second line is the timestamp to tell you when the movement happened.

At the base of the card, you’ll discover the document name just as the area of the record for reference.

It would be ideal if you note that for records to show up in the Recommended Documents area, they should be put away on OneDrive for Business or SharePoint.

Accessibility

The element is as of now accessible in the most recent Insider works of Word, Excel and PowerPoint for Windows. It is likewise effectively accessible worldwide on Office.com and in Word, Excel and PowerPoint for iOS and Mac.

  • Criticism

We’d love to get notification from you! Tell us what you think and present your criticism utilizing the Send-a-Smile (??) and Send-a-Frown (??) catches in Word, Excel, or PowerPoint. You can likewise give criticism by means of Office.com through the Feedback callout at the base of the page.

How to Troubleshoot Microsoft Office Setup Error code 17002?

MS office application is now an important part of our day to day life as it deals about our work, studies, business etc. And as it is a development era MS has launched the secured products and well developed such as Office 2016 and Office 365 and also MS Office 2013 which was precede of Office 2016 and Office 365.

Step 1: Temporarily disable Antivirus and Firewall

Error code 17002 while updating the MS Office may persist in case of firewall or network restriction. The firewall or network rules in the network may block the installation of MS Office program or its updating as a part of their security measurements. These firewall rules and Antivirus are implemented on the device by the network provider or the user of the device on its registry or core system.

Follow the steps given below to disable Firewall:

Step 1. Go to the control panel

Step 2. Open the system and security and then to “Windows Firewall”

Step 3. Click on the option of switch windows firewall on or Off

Step 4. Choose the option of  Switch Off firewall for both private and public network.

Step 5. Try installing or updating the MS Office and check whether the Error code 17002 is resolved.

Follow the steps to disable Antivirus:

Step 1. Go to the Antivirus application installed on the device

Step 2. Click on the settings and then navigate to real time protection.

Step 3. Switch Off real time protection.

Step 4. Navigate to Antivirus firewall.

Step 5. Switch off Antivirus firewall.

Step 6. Click on the option of YES or OK confirmation prompt if encouraged

Step 7. Try updating the MS Office and check whether the Error code 17002 is resolved.

Step 2. SFC Scan to fix Error code 17002   

Error code 17002 also persists in case of corruption or device file errors. If the Error code 17002 is due to the system file corruption, it could be fixed easily by the SFC scan.

Step 3. Registry repair to resolve Error code 17002

Error code 17002  also persists due to key value errors or registry corruption. A single key value damage or corruption change may lead to malfunctioning of the entire Microsoft Office program.

Step 4. Eliminate and reinstallation.

If Error code 17002 is not set in the registry repair, antivirus exception and SFC scan, is required to eliminate the MS Office suite completely from the features and programs.

Follow the steps to resolve Error code 17002 completely.

Step 1. Open the control panel and click on the option of “uninstall softwares and features”

Step 2. Look for Microsoft Office in the list.

Step 3. Choose the option of “Microsoft Office” and then click on the uninstall button.

Step 4. Once un-installation is finished, try running Office setup to install Microsoft Office.

Steve Smith is a self-professed security expert; she has been making the people aware of the security threats. Her passion is to write about Cybersecurity, malware, social engineering, Games,internet and new media. She writes for Ms-Office products at office.com/setup or office.com/myaccount .

How to Set Up Microsoft Office on your Mac device? – www.office.com/setup

Microsoft Office has been a basic necessity in our everyday life for long. Be it office or school, you can’t deny the way that you completely depend on MS Office for accomplishing day by day targets. The suite which was at first begun with not many applications, for example, MS Word, Excel, and PowerPoint has become fundamentally giving different applications and services to coordinating various needs of the individuals.

Microsoft Office setup is accessible in various forms, for example, Office 2013, Office 365, and many more. Only the Desktop version of the Office is open on devices running on Windows as well as Mac Operating System. However, Office 365 can be worked on each devices.

Before proceeding with the steps to configure www.office.com/setup, you should guarantee that your Office setup key is handy.

Method to install and activate MS Office on Mac OS

Given below are the steps to install and activate MS Office on Mac OS. This strategy is useful for installation any Office suite or version.

  1. At first, visit the official site of MS Office.
  2. Log in to your Microsoft account, if you have already one.
  3. The account from which you sign in ought to be the one which is connected with your Office membership or it is a work or school account.
  4. Click On “Install Office” or “Install Office Apps” links which you will see on the home page of the Office.
  5. Click “install” under the desired version of Office.
  6. Follow the guidelines to finish the Office installation process.
  7. Wait for a couple of minutes.
  8. Now, Click open “finder” on your Mac.
  9. Go to the “Downloads”.
  10. You will see the Microsoft Office installer.pkg file. Double click on it.
  11. Click on the “Continue” choice to start the installation procedure.

(NOTE: If you get an error message saying Microsoft Office installer.pkg can’t be opened then move the file from the Downloads folder to the Desktop.)

  1. Now press Ctrl + click. This will launch the Office installer document.
  2. Click “Continue” to get the software license agreement and click “Agree”.
  3. Now verify your Mac login credentials and tap “Install software”.
  4. Click “Close” when the Office installation procedure gets finished.
  5. After this, activate your Office by product activation key.
  6. You are now able to use MS Office on your Mac Os.

You can also visit office.com/setup to find out about Office and its applications. Here you will discover various articles committed to helping you all through your Office experience. You will likewise become more informed with about different Office related updates. Get Support by customer support number if you face any problems with office working, installation and its applications.

Netflix Set To Create A He-Man Anime Series – Office.com/setup

Famous anime like Attack on Titan, Detective Conan/Case Closed, Berserk: The Golden Age, One Punch Man, Mobile Suit Gundam UC, Fullmetal Alchemist, and Death Note are already available on Netflix. However, the streaming service is not stopping just here. Netflix is collaborating with Mattel and Kevin Smith to produce an anime series on He-Man. The new series will be named He-Man and The Master of The Universe. With Netflix’s She-Ra and the Princesses of Power show with DreamWorks Animation being a hit, it is no surprise that Netflix is investing in another animated series. The show was well-received by both the fans and critics alike. The show is set to release its third season with a trailer dropped at the Comic-Con held in San Diego.

Now along with She-Ra, He-Man and the Masters of the Universe movie are in the making. The film will include Noah Centino who played a role in the To All The Boys I have Loved Before series. Adam Nee and Aaron will direct the live-action adaptation, and Art Marcum will write the script along with Matt Holloway.

Smith, who will be running and producing the show, said that he is grateful to Netflix and Mattel TV for trusting him with the job. Not only the Greyskulls’ secrets but their entire universe too. Smith stated that in Revelation, they would tell an epic story of finale between He-Man and Skeletor.

Mattel TV is working alongside Rob David who is Mattel TV’s Vice President and also the writer of He-Man The Eternity War. Writers consist of Eric Carrasco known for Supergirl, Tim Sheridan is known for Reign of the Supermen, Diya Mishra is known for Magic the Gathering, and Marc Bernardin is known for Alphas.

The He-Man anime series will focus on unsolved storylines from the 80’s series. It would feature familiar characters, and according to Smith, this could be the finale between Skeletor and He-Man. The show would be produced by Mattel series, and the animation will be handled by Powerhouse animation. Powerhouse also animated Netflix’s Castlevania.

Smith promises to provide you the series you always wanted to watch as a kid. The He-Man: Master of the Universe will probably be the ending of the series we always wanted. However, the show may take its sweet time, as Netflix has not announced as to when it will be available to stream.

David stated that the Masters of the Universe has always been a phenomenon, and it has inspired people for generations. The fans of the series have always craved a continuation for the series. With Kevin Smith himself being a He-Man fan,and the talented writers and crew members, this is the perfect scenario to release the He-Man series.

Howdy, I’m  Lily Johnsol. I’m a software engineer living in Manhattan, New York. I am a fan of technology, photography, and design. I’m also interested in music and blogging. You can visit my website office.com/setup.

How to Make Time-Lapse in a Video using the iMovie App

Time-Lapse is a handy feature, and it is used to boost the playback speed in a movie or video. Think if you want to make a clip of clouds, which are moving rapidly in the sky, to get that effect in your clip, you will need to enhance the playback speed. Time-Lapse is a technique which increases the speed of a clip. iMovie is one of the best video editing software of all time, and it offers many essential functions to its users, such as time-lapse.

If you want to learn how to use the time-lapse feature in iMovie app, then this article will help you to do just that. Let’s get started.

How to Use Time-Lapse Feature in iMovie on Your Mac?

The iMovie 10 allows you to speed up a video up to 20 times more than your average video speed. If you also got iMovie 10 on your Mac, then it is good news because you can get the fastest time-lapse when compared to its old versions. To start using the Time-Lapse feature on your Mac, see the instructions given below:

  1. Navigate to the iMovie app on your Mac
  2. After the app opens, go to ‘File” located in the upper menu.
  3. Now choose the “Import” option from the list to load the video from your Mac. If you want to import the video directly from your camera, then choose the “Import from Camera” option.
  4. Now you have to hold the video thumbnail inside “My Media” and drag it to the timeline located in the bottom.
  5. After that, you will see that your clip is divided into multiple frames over the timeline. Now click on the clip appeared on your timeline.
  6. Now tap on “clock” icon appearing at the media preview area which is located at the top of the editor.
  7. There you have to decide the speed of your clip according to your choice.
  8. Finally, tap the share button to save the video on your storage. It also allows one to share it over social media channels such as YouTube, Facebook, and more.

How to Make Time-Lapse on iPhone and iPad?

If you have iMovie on your iOS device, then it will allow you to create time-lapse even on your phone or tablet. If you haven’t installed the iMovie app on your device, then do it now by visiting your Apple App Store. See the instructions below to learn how to use this feature on your iPhone or iPad:

  1. Open the iMovie app.
  2. Now go to ‘Projects’ from the top of your screen.
  3. After that press on the “Create Project” option.
  4. Browse and import a video file in which you want to make time-lapse.
  5. Now select your clip located in the timeline. You will see a tiny toolbox at the bottom of your display.
  6. Click on the “clock” button appeared on the bottom-left of your device. Just after that, you will see a speed adjusting slider.
  7. Now adjust the speed bar slider to enhance and decrease the speed of your clip.
  8. Finally hit the ‘Done’ button.

The edited clip will now be saved inside the iMovie album.

Kellie Minton is a qualified IT engineer by education. After working in the IT sector for a decade, she began writing about it two years ago. She loves to write about emerging technology like office.com/setup.